Introduction to Brownie Graveyard Recipe
The brownie graveyard recipe is not merely a dessert; it’s an adventure into the whimsical world of culinary arts where chocolatey goodness meets spooky aesthetics. Originating from the playful spirit of Halloween celebrations, this recipe has transcended its seasonal status, becoming a fun, engaging, and delicious activity for families, friends, and baking enthusiasts alike. The brownie graveyard is more than a dish; it’s a creative expression, a delightful treat, and a tiny adventure into a world where every bite tells a story of spooky, sweet delights.
Ingredients for Brownie Graveyard Recipe
Embarking on the journey to create a brownie graveyard recipe requires a treasure trove of ingredients that go beyond the basic brownie mix. From the rich, gooey brownie base to the edible tombstones and ghostly decorations, each element plays a crucial role in bringing the graveyard to life. The chocolate base, creamy frosting, and imaginative decorations all converge to create a dessert that is as visually stunning as it is delectably satisfying.
Step-by-Step Guide to Making Brownie Graveyard recipe
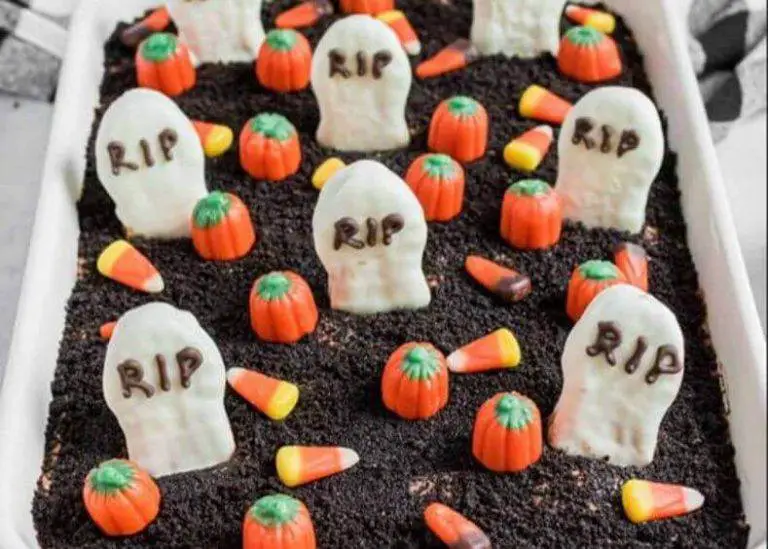
here’s a step-by-step guide to making a spooky and delicious Brownie Graveyard recipe ! This fun dessert is perfect for Halloween or any spooky-themed event.
Ingredients:
- 1 box of brownie mix (and any required ingredients like eggs, oil, or water)
- 1 cup of chocolate frosting
- Crushed chocolate cookies (like Oreos)
- Milano cookies or any oblong-shaped cookies
- White and black decorating icing
- Candy pumpkins or other Halloween candy for decoration
- Gummy worms
Instructions:
Step 1: Bake the Brownies
- Preheat your oven according to the instructions on the brownie mix box.
- Prepare the brownie batter following the instructions on the box.
- Pour the batter into a greased baking pan and bake as directed.
- Allow the brownies to cool completely after baking.
2: Prepare the Graveyard Ground
- Once the brownies have cooled, spread a layer of chocolate frosting over the top.
- Sprinkle crushed chocolate cookies over the frosting to resemble dirt.
3: Create the Tombstones
- Use the white decorating icing to write RIP or other spooky messages on the Milano cookies.
- Gently press the cookies into the brownies, standing upright, to resemble tombstones.
4: Add Spooky Decorations
- Place candy pumpkins, gummy worms, or other spooky candies around the tombstones to create a graveyard scene.
- Optionally, use black decorating icing to draw spiders, bats, or other spooky creatures on the brownie surface.
5: Serve and Enjoy
- Use a knife to cut around each tombstone, creating individual graveyard brownie servings.
- Serve on a plate and enjoy your spooky and delicious treat!
Tips:
- You can use homemade brownie and frosting recipes if you prefer.
- Feel free to get creative with the decorations! Use different candies and icing designs to make your graveyard unique.
- If you’re serving this at a party, consider adding a few spooky elements to the serving table, like fake spider webs or skeletons, to enhance the theme.
Designing Your Brownie Graveyard :
Designing a Brownie Graveyard can be a fun and creative activity, especially during Halloween. Here’s a guide to help you design a spooky and delicious brownie graveyard.
Conceptualizing the Design:
1. Theme Selection:
- Classic Graveyard: Tombstones, ghosts, and skeletons.
- Zombie Apocalypse: Zombies emerging from graves.
- Witch’s Lair: Witches, cauldrons, and black cats.
- Haunted Mansion: A small haunted house with ghosts and ghouls.
2. Color Palette:
- Primary Colors: Black, white, and orange.
- Accent Colors: Green (for a spooky glow) and purple.
3. Layout:
- Foreground: Tombstones and other main elements.
- Midground: Smaller decorative items like candy pumpkins or gummy worms.
- Background: Consider a backdrop if presenting on a table, such as a haunted house silhouette.
Creating the Brownie Graveyard:
1. Brownie Base:
- Shape: Consider a rectangular or square shape for easy placement of design elements.
- Texture: Use crushed cookies or edible dirt to create a realistic graveyard ground.
2. Tombstones:
- Material: Use Milano cookies, sugar cookies, or grey fondant.
- Design: Write “RIP” or draw cracks with edible markers or icing.
3. Figures and Creatures:
- Ghosts: Use marshmallows or white fondant.
- Zombies: Green-tinted fondant figures or zombie hand picks.
- Witches: Use witch hat picks or create fondant witches.
- Animals: Use candy shapes or fondant for bats, cats, or rats.
4. Additional Elements:
- Trees: Pretzel sticks with green candy melts for leaves.
- Fences: Use black licorice or create fences with dark chocolate.
- Cauldron: A small cupcake with green icing for a witch’s brew.
5. Special Effects:
- Fog: Use a dry ice effect if safe and appropriate for your setting.
- Lighting: Small LED lights or glow-in-the-dark elements for a spooky effect.
Assembling the Brownie Graveyard:
1: Prepare the Base
- Bake and cool the brownie. Apply a layer of chocolate frosting and sprinkle with crushed cookies for the ground.
2: Place the Tombstones
- Insert the cookie tombstones at varying depths and angles for a more natural look.
3: Add Figures
- Position the fondant or candy figures strategically around the tombstones.
4: Add Additional Elements
- Place trees, fences, and other additional elements to enhance the scene.
5: Final Touches
- Add special effects and ensure all elements are securely placed.
- Consider adding a backdrop or side elements if presenting on a table.
Presentation:
- Choose a serving tray or board that complements your design.
- Add additional decorations around the serving area, like fake spider webs, pumpkins, or themed tablecloths.
Tips:
- Plan your design on paper before starting to ensure all elements fit well.
- Ensure all materials used are food safe and edible, where applicable.
- Consider the age group of your audience to make it appropriately spooky and fun.
Enjoy designing, creating, and eventually devouring your spooky Brownie Graveyard!
Kid-Friendly Brownie Graveyard Recipe
Ingredients:
For the Brownies:
- 1 box of brownie mix (and ingredients listed on the box, typically water, oil, and eggs)
- Cooking spray or parchment paper
For the Decorations:
- 1 cup of chocolate frosting
- 1 cup of crushed chocolate cookies (for “dirt”)
- Gummy worms
- Milano cookies (or any oblong cookie for “tombstones”)
- White icing (for writing on the “tombstones”)
- Candy pumpkins or other Halloween candies
Instructions:
Step 1: Bake the Brownies
- Preheat the oven as per the instructions on the brownie mix box.
- Prepare the brownie batter according to the package instructions.
- Line a baking pan with parchment paper or lightly spray with cooking spray.
- Pour the brownie batter into the pan and bake as per the box instructions.
- Once baked, allow the brownies to cool completely.
2: Create the Graveyard Scene
- Spread the chocolate frosting evenly over the cooled brownies.
- Sprinkle the crushed chocolate cookies over the frosting to create a “dirt” effect.
- Place gummy worms partially on the brownie surface, making them appear like they are crawling out of the ground.
3: Prepare the Tombstones
- Write spooky words or names with white icing on the Milano cookies, such as “RIP”, “Boo”, or any fun names you’d like.
- Insert the cookies into the brownies, ensuring they are secure and resemble tombstones.
4: Add Additional Decorations
- Scatter candy pumpkins or other Halloween candies around the graveyard for added effect.
- Feel free to add any additional decorations like candy ghosts or candy corn to enhance the spooky atmosphere.
5: Serve and Enjoy!
- Cut the brownies into squares, ensuring each piece has a “tombstone”.
- Serve to eager little ghouls and goblins and enjoy the spooky, delicious treats!
Tips:
- Involve the kids in decorating the graveyard. They can help write on the tombstones and place the gummy worms and candies.
- You can use a homemade brownie recipe if you prefer over the box mix.
- Feel free to get creative with the decorations and create your own spooky scenes!
Enjoy your spooky, kid-friendly brownie graveyard!
Brownie Graveyard for Different Occasions
Creating a brownie graveyard can be a fun and spooky way to celebrate various occasions, whether it’s Halloween, a themed birthday party, or any event where a little bit of playful eeriness is welcomed. Here’s a guide on how to create a brownie graveyard for different occasions:
General Ingredients:
- Brownie mix (or your favorite homemade brownie recipe)
- Crushed chocolate cookies (for the “dirt”)
- Rectangular or square baking pan
- White chocolate (for the “bones”)
- Dark chocolate (for writing on the tombstones)
- Milano cookies or similar (for the “tombstones”)
- Green frosting (for the “grass”)
- Candy pumpkins, gummy worms, or other spooky candies
Steps to Create a Brownie Graveyard:
- Bake the Brownies:
- Prepare and bake your brownies according to the recipe or package instructions.
- Allow them to cool completely before decorating.
- Prepare the Tombstones:
- Melt the dark chocolate and use it to write eerie words like “RIP” or draw spooky images on the Milano cookies.
- Allow the chocolate to set.
- Create the Graveyard Scene:
- Sprinkle the crushed chocolate cookies over the brownies to create a “dirt” effect.
- Insert the tombstone cookies into the brownies at regular intervals.
- Use green frosting to pipe grass around the tombstones.
- Add candy pumpkins, gummy worms, or other spooky candies for additional graveyard effects.
Adapting the Graveyard for Different Occasions:
- Halloween:
- Use classic Halloween symbols like bats, ghosts, and witches as additional decorations.
- Consider using orange frosting for a Halloween-themed color scheme.
- Birthday Party:
- Write the birthday person’s name and age on the tombstones with edible markers or melted chocolate.
- Add fun elements like candy flowers or cheerful skeletons to lighten the mood.
- Movie Night:
- Choose candies and decorations that match the theme of the movie you’re watching.
- Consider creating tombstones that feature famous quotes or characters from the movie.
- Anniversary or Adult Party:
- Opt for a more elegant look by using gold or silver edible spray on the tombstones.
- Use dark chocolate shavings as dirt for a more sophisticated appearance.
- Kids’ Party:
- Make it fun and less spooky by using colorful candies and avoiding scary symbols.
- Consider adding edible glitter to make it more magical and enchanting.
Additional Tips:
- Vegan or Allergy-Friendly Version: Ensure all ingredients, including the brownie mix, chocolates, and candies, adhere to dietary requirements.
- Gluten-Free Version: Use a gluten-free brownie mix and ensure all additional ingredients are gluten-free.
- Interactive Element: Allow kids or party guests to decorate their own tombstone cookie as a fun activity.
Creating a brownie graveyard can be as simple or elaborate as you wish. By adjusting the elements and decorations, you can tailor it to fit any occasion, ensuring it’s always a hit at your gatherings!
Troubleshooting Common Brownie Issues
Baking the perfect brownie might sometimes come with its own set of challenges. Here’s a troubleshooting guide to help you navigate through some common brownie-baking issues:
1. Brownies Too Dry or Overcooked:
- Issue: Overbaking or too much flour.
- Solution: Reduce baking time and ensure accurate measurements of ingredients. Use a toothpick to check doneness – it should come out with a few moist crumbs.
2. Brownies Too Gooey or Undercooked:
- Issue: Underbaking or inaccurate oven temperature.
- Solution: Ensure your oven is preheated and calibrated correctly. Allow brownies to bake fully, and let them cool completely as they continue to set while cooling.
3. Brownies Don’t Have a Shiny, Crackly Top:
- Issue: Mixing method or sugar type.
- Solution: Ensure to thoroughly mix the sugar and wet ingredients until fully dissolved. Using granulated sugar and making sure it’s well mixed with the fat typically results in a shiny top.
4. Brownies Are Too Dense or Heavy:
- Issue: Overmixing or too much fat.
- Solution: Only mix until ingredients are combined to avoid developing the gluten in the flour. Ensure accurate measurements of oil or butter.
5. Brownies Are Too Cakey:
- Issue: Too much leavening agent or eggs.
- Solution: Reduce the amount of baking powder or use fewer eggs. Adjust the recipe to have a higher fat-to-flour ratio for fudgier brownies. For a deeper dive into understanding brownie textures, check out this guide on Cakey and Fudgy Brownies.
6. Brownies Stick to the Pan:
- Issue: Pan not properly greased or lined.
- Solution: Use parchment paper or ensure the pan is well-greased. Allow brownies to cool completely before attempting to remove them.
7. Sinking Middle:
- Issue: Overmixing or opening the oven door too often.
- Solution: Mix just until combined and avoid opening the oven door during baking to keep a consistent temperature.
8. Edges Are Too Hard:
- Issue: Overbaking or high oven temperature.
- Solution: Ensure accurate oven temperature and consider using a light-colored pan which absorbs less heat. Remove brownies from the oven when a toothpick comes out with a few moist crumbs.
9. Uneven Baking:
- Issue: Oven hot spots or pan material.
- Solution: Rotate the pan halfway through baking and consider using an oven thermometer to check for hot spots. Use a light-colored metal pan for even heat distribution.
10. Ingredients Separating:
- Issue: Incorrect order of mixing or temperature of ingredients.
- Solution: Follow the recipe instructions for the order of adding ingredients. Ensure ingredients like eggs and butter are at room temperature.
Additional Tips:
- Test Your Oven: Regularly check your oven’s temperature accuracy with an oven thermometer.
- Quality Ingredients: Use high-quality chocolate and fresh ingredients.
- Cooling: Allow brownies to cool in the pan, placed on a wire rack, to ensure they set properly.
- Cutting: Use a plastic knife or one with a serrated edge for cleaner cuts. Ensure brownies are completely cool before cutting.
For a twist on the classic brownie, explore this Slutty Brownies Recipe for a layered treat that’s sure to delight!
FAQs
How to make brownies in a jar?
Creating brownies in a jar is a delightful and innovative way to gift a sweet treat. The method involves layering dry ingredients in a jar and providing instructions for the recipient to add wet ingredients and bake. For a detailed guide and creative ideas on how to make brownies in a jar, you might visit Allrecipes for a variety of recipes and tips.
How to make chocolate brownies Jamie Oliver?
Jamie Oliver’s chocolate brownies often involve using quality dark chocolate, unsalted butter, a mix of brown and white sugar, eggs, and flour. The method generally involves melting the chocolate and butter together, then mixing in the sugars, followed by the eggs, and finally, the flour, ensuring each ingredient is fully incorporated before adding the next. The mixture is then poured into a lined baking tray and baked until set but still gooey in the middle. For exact measurements and specific instructions, it’s recommended to check Jamie Oliver’s official recipes or cookbook.
Does milk instead of water make brownies better?
Using milk instead of water in brownies can enhance the richness and flavor of the dessert. Milk adds a creamy texture and a rich, decadent taste to the brownies, making them moister and more luxurious than when made with water. However, the choice between milk and water can depend on personal preference and dietary needs.
What makes brownies fudgy or cakey?
The texture of brownies, whether fudgy or cakey, is determined by the ratio of fat (butter and chocolate) to flour used in the recipe. Fudgy brownies have a higher fat-to-flour ratio, resulting in a dense, moist texture. In contrast, cakey brownies have a higher flour content and often involve the use of a leavening agent like baking powder, resulting in a lighter, more cake-like texture. Additionally, the mixing method and baking time can also influence the texture of the brownies.
Conclusion: Wrapping Up the Brownie Graveyard Adventure
Embarking on the culinary journey of crafting a brownie graveyard recipe is an adventure that extends beyond the realms of baking. It’s a dive into a world where creativity, flavor, and fun converge to create a dessert that is as delightful to craft as it is to consume. Whether you’re a seasoned baker or a novice stepping into the whimsical world of themed desserts, the brownie graveyard recipe offers a canvas to explore, create, and indulge in a deliciously spooky experience. May your brownies be spooky, your graveyard eerie, and your culinary adventures delightfully sweet!